John_Admin
-
Content Count
1652 -
Joined
-
Last visited
-
Days Won
42
Posts posted by John_Admin
-
-
How did you solved the problem??
-
Keys WITH expiration date and
NO expiration date keys - differ by expiration date ONLY
The functionality of keys are common and the same.
So I think it is something with printer device hardware or firmware -
You mean WiFi function doesn't work after you make printer chipless????
-
What is your current firmware version in your printer now??
-
Please follow Step by Step Tutorial how to make Your XP-4100 chipless - http://www.2manuals.com/product_info.php?cPath=107&products_id=1945
-
What problem do you have?? Can You explain??
-
What do you mean???
-
We can't find your order. Are you sure you purchased keys from our site???
-
Thank You for Your order # 191425
Charge for this order will appear in Your Bank Statement as Vals Finance LLC
Please use Your Activation Key:
DFM4K-RGYBT-W2D34-HQMT8-W9HM2 - use before September 1 -
Give us your Order Number please
-
Yes You have first make your printer chipless.
Follow Step by Step Guide here -
http://www.2manuals.com/product_info.php?cPath=107&products_id=1924
License.exe utility works under Windows only.
You can bring your printer to PC somewhere to make procedure. Then take back to MAC to work with it. -
We have sent you new key in PM please check
-
Please check now PM
-
we have sent you new key in PM
please check
-
Please check PM with new key
-
-
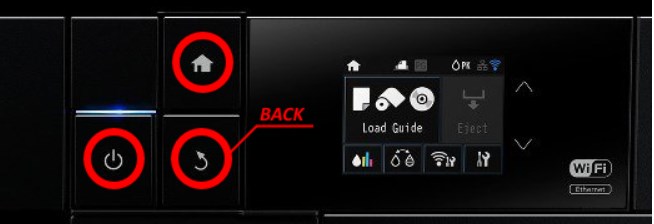
Epson
SC-P600, SC-P607, SC-P608, PX5V2
SC-P800, SC-P807, PX3V
Power OFF the printer and in 20 seconds press and hold such buttons::
BACK + HOME + POWER – wait until on printer monitor you will see WHITE text - Firmware Update Mode – then Release all buttons. If text is in red color - that is wrong mode. Try once more time.Next Step - Upload Firmware to printer.
Run EPFWUPD.EXE file and follow all steps until Firmware will upload in printer.When Firmware Update is Finished - confirm that new Firmware Version is displayed on the LCD.
Press POWER button - printer will turn OFF.Step 5. Switch ON the printer. Printer will be in regular condition.
Note 1: If upload process stuck at 70-80% - You have to unplug printers power cable for 1 min and switch printer ON.
Confirm right firmware version is now in Your printer. Read how to check current firmware version here.Note 2: If printer doesn't accept firmware - try to make it in Recovery Mode - read how HERE
Confirm right firmware version is now in Your printer. Read how to check current firmware version here.Go back to main Guide to use Activation Key
-
Epson
WF-2630, WF-2631
WF-2650, WF-2651
WF-2750, WF-2752
WF-2760, W-2761
WF-4630
Power OFF the printer and in 20 seconds press and hold such buttons::
STOP + 1 + HOME + POWER – wait until on printer monitor you will see WHITE text - Firmware Update Mode – then Release all buttons. If text is in red color - that is wrong mode. Try once more time.Next Step - Upload Firmware to printer.
Run EPFWUPD.EXE file and follow all steps until Firmware will upload in printer.When Firmware Update is Finished - confirm that new Firmware Version is displayed on the LCD.
Press on the 0 – printer will turn OFF.Step 5. Switch ON the printer. Printer will be in regular condition.
Note 1: If upload process stuck at 70-80% - You have to unplug printers power cable for 1 min and switch printer ON.
Confirm right firmware version is now in Your printer. Read how to check current firmware version here.Note 2: If printer doesn't accept firmware - try to make it in Recovery Mode - read how HERE
Confirm right firmware version is now in Your printer. Read how to check current firmware version here.Go back to main Guide to use Activation Key
-
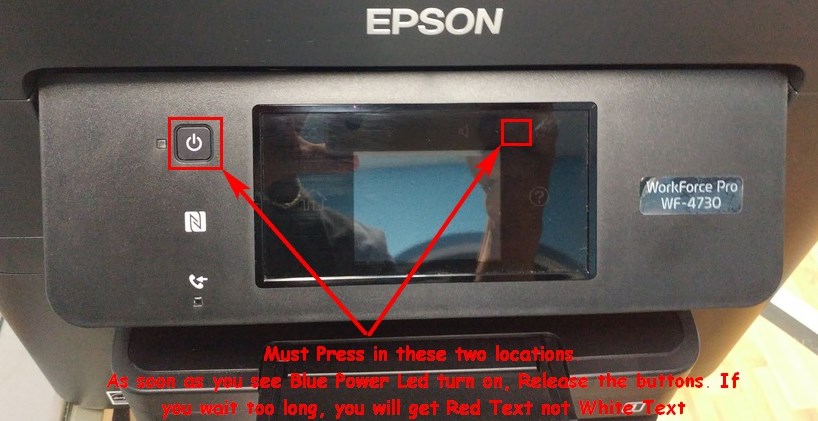
Epson WF-4720, WF-4730, WF-4733, WF-4734, PX-M780F
Press and hold:

RIGHT UPPER DISPLAY CORNER + POWER – wait about 3 sec until Blue Power Led is ON - then release all buttons. On printer monitor you wil see WHITE text - Firmware Update Mode. If text is in red color - that is wrong mode. It means You hold too long. Try once more time.Next Step - Upload Firmware to printer.
Run EPFWUPD.EXE file and follow all steps until Firmware will upload in printer.
When Firmware Update is complete confirm that new Firmware Version is displayed on the LCD.
Press on the CENTER of TOUCH SCREEN – printer will turn OFF.
Switch ON the printer. Printer will be in regular condition.Note 1: If upload process stuck at 70-80% - You have to unplug printers power cable for 1 min and switch printer ON.
Confirm right firmware version is now in Your printer. Read how to check current firmware version here.Note 2: If printer doesn't accept firmware - try to make it in Recovery Mode - read how HERE
Confirm right firmware version is now in Your printer. Read how to check current firmware version here.Go back to main Guide to use Activation Key
-
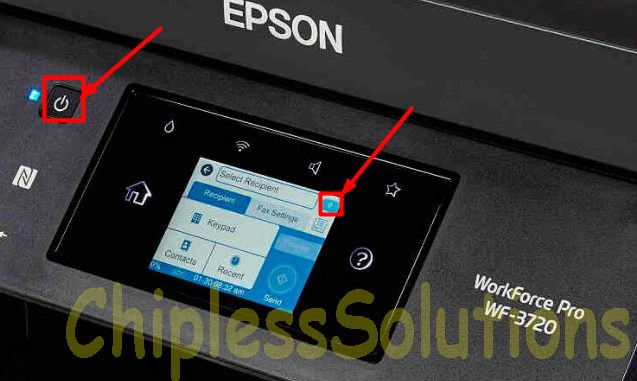
Epson
WF-2860, WF-2861, WF-2865
WF-3720, WF-3721, WF-3723, WF-3725, WF-3730, WF-3733, PX-M680FPress and hold:

RIGHT UPPER DISPLAY CORNER + POWER – wait 20 sec or until power LED is ON then release all buttons. You will see text on the printer's LCD monitor in WHITE color - Firmware Update Mode.
If text is in red color - that is wrong mode. Try one more time.
If this way doesn"t work - You have to use other.
Please go here to see other ways to put printer in Program Update Mode - How to put WF3720 in Program Update ModeNext Step - Upload Firmware to printer.
Run EPFWUPD.EXE file and follow all steps until Firmware will upload in printer.
When Firmware Update is complete confirm that new Firmware Version is displayed on the LCD.
Press on the CENTER of TOUCH SCREEN – printer will turn OFF.
Switch ON the printer. Printer will be in regular condition.Note 1: If upload process stuck at 70-80% - You have to unplug printers power cable for 1 min and switch printer ON.
Confirm right firmware version is now in Your printer. Read how to check current firmware version here.Note 2: If printer doesn't accept firmware - try to make it in Recovery Mode - read how HERE
Confirm right firmware version is now in Your printer. Read how to check current firmware version here.Go back to main Guide to use Activation Key
-
Upload firmware to printer in normal mode - dont put printer in Program Update mode.
The uploading process will stuck at 70-80% - it is ok!
Open task manager and stop updater process.
Printer will blink for about 5-15 minutes - then will power OFF.Now power on the printer - chipless firmware is installed now in your printer!
Use License and Activation Key -
Input Key correctly
-
-
Please contact person whom you have paid directly
-
 1
1
-
Need WorkForce Pro WF-C8190DW
in Chipless Firmware by License.exe utility
Posted · Report reply
Maybe next year