

wic.support
-
Content Count
449 -
Joined
-
Last visited
-
Days Won
28
Posts posted by wic.support
-
-
Good day.
Please, in the main menu select "support >> send error report" then fill all required fields and click OK, the application will send its log files to the server and I will check the problem.
-
Good day. Please restore official firmware first then try to update the printer again with this firmware:
https://chiplesssolutions.com/download/chipless/WFC869_FWF483TL_HR10I8_HR99Z9.zip
in the service mode, after that update printer one more time but this time in the normal mode (i.e. just press the power button).
Once all of this is done try to activate the printer and write the results.
-
Good day. Please, download license executable again from the chipless solutions, make sure that it has this date in the header - 23.09.2021 and try again.
-
You can disable processes from WIC:
1. Start WIC as administrator.
2. In the main menu select `Support > Disable Processes`
3. Disable all lister processes and services.
4. Restart the printer and try to reset again.
-
Good day. Try to remove power cable for 10 minutes then plug it in again and power it on.
If this does not help, try to start the printer in the service mode, unfortunately, we do not have exact combination of keys for this, try this first:
STOP + PAPER SETUP + LEFT ARROW + POWER
STOP + DOWN + LEFT + POWER
-
Good day. Please, try to upload official firmware then upload chipless firmware first in the service mode and then in normal mode, try again. If it will not help contact me directly via contact information I will send you in the PM.
-
Instructions is available in the WIC when printer is connected in the normal mode. There are only one way to do this:
Power cord must be connected and printer is powered off.
Press and hold "resume/cancel" button (triangle in the circle).
Press ON button while holding "resume/cancel" button (now you are holding both).
While holding the ON button press "resume/cancel" button 5 times.
Each time when you are pressing "resume/cancel" the error and power LEDs will light alternately.
Release ON button.
"Resume/cancel" button must be pressed EXACTLY 5 times.
Printer may be started in different mode that is indistinguishable from the service mode when another combination is used, but service functions will not work!
If at the end error LED is still ON (not blinking) and POWER LED is off then service mode was blocked.
The only known solution in this case is to replace eeprom chip.If this does not work then most likely service mode has been blocked for the device.
-
 1
1
-
-
Did you mean PRO3880, it seems to be a quirk of the browser, please, try to download with Edge.
http://epson.2manuals.com/ap/pro3880_demo.zip
the file itself is clean:
-
Good day. This is supposed to happen, please, read this first:
-
Added support for EC-C7000 with firmware downgrade option, earliest firmware we have for this device is CD20KA (20/10/2020).
-
1
-
-
I got the report, I will write here when there are will be any results.
-
1
-
-
You can always stop the process via task manager directly or use `support >> disable processes` from the WICReset menu.
-
What firmware version you currently have on the printer and what official version you are using for recovery. Also, are you updating the printer in the normal mode or service mode?
-
What exactly happens when you try to update the printer with recovery firmware?
-
Are you using WICReset or adjustment program? Please, send screenshot.
-
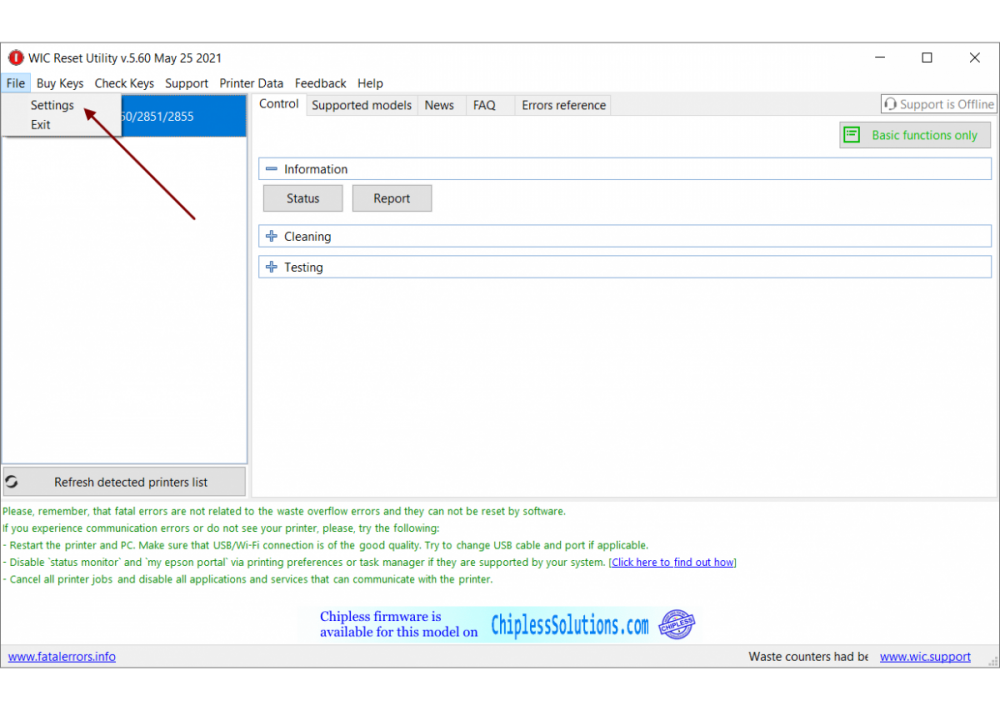
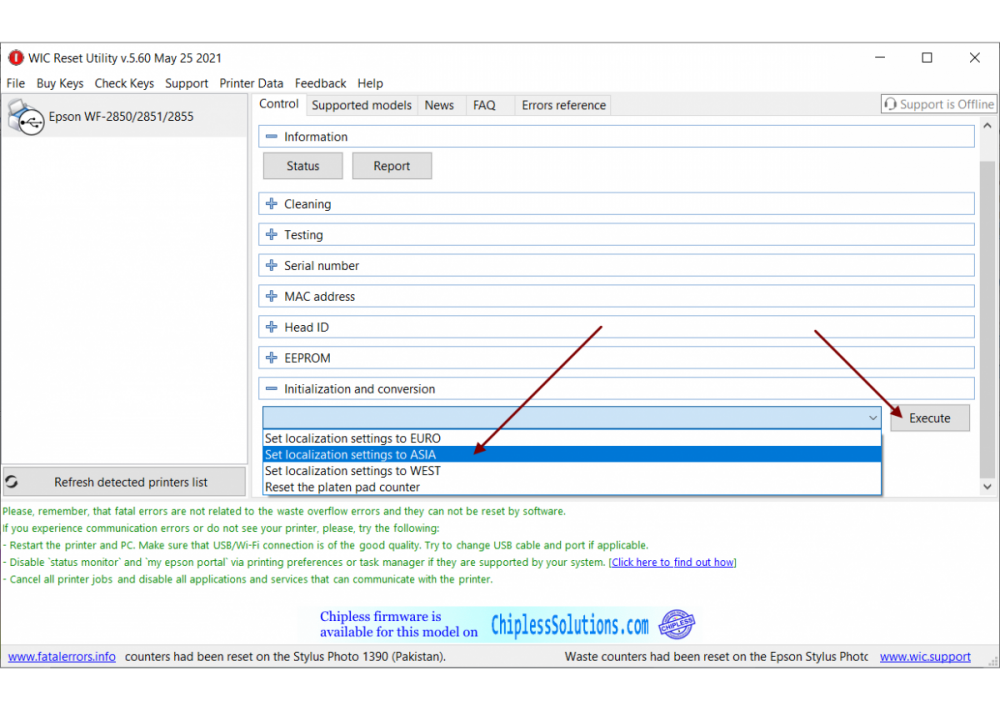
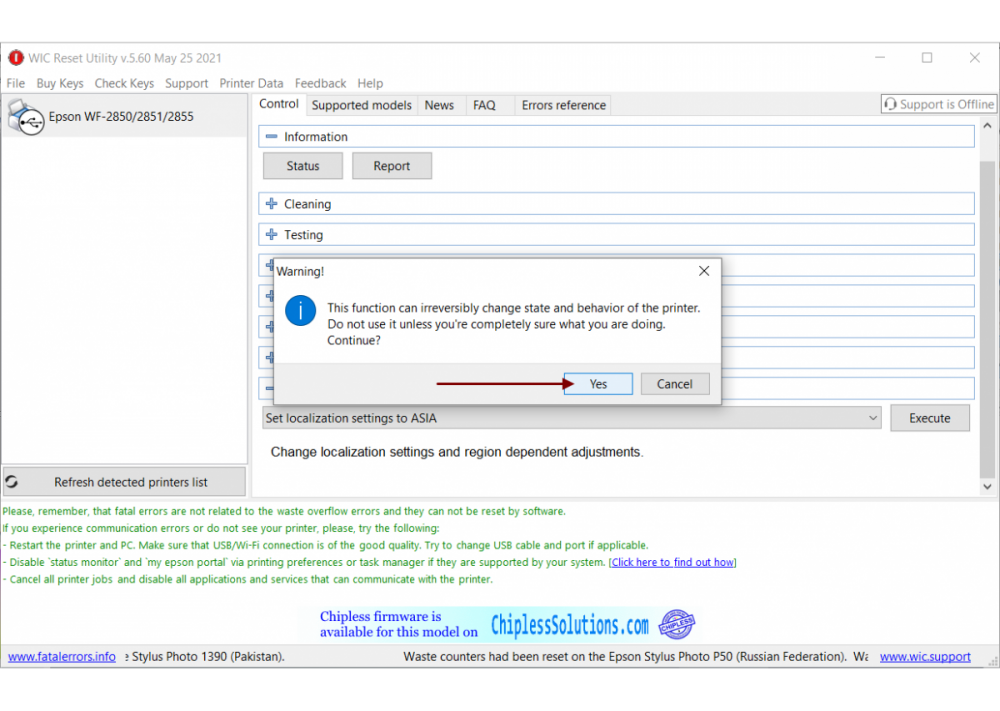
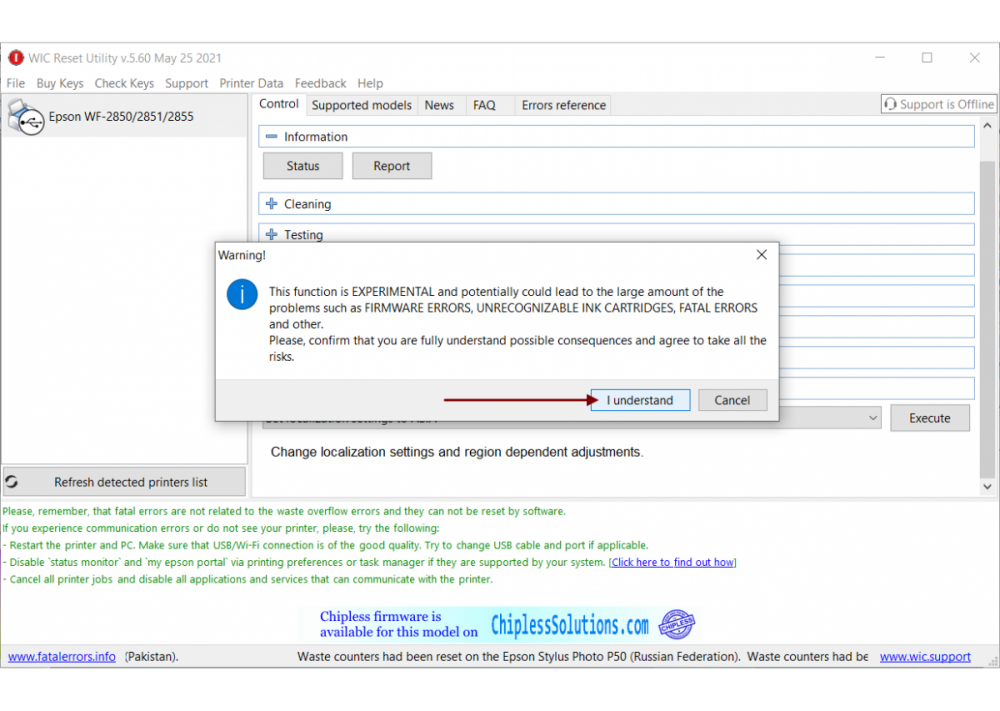
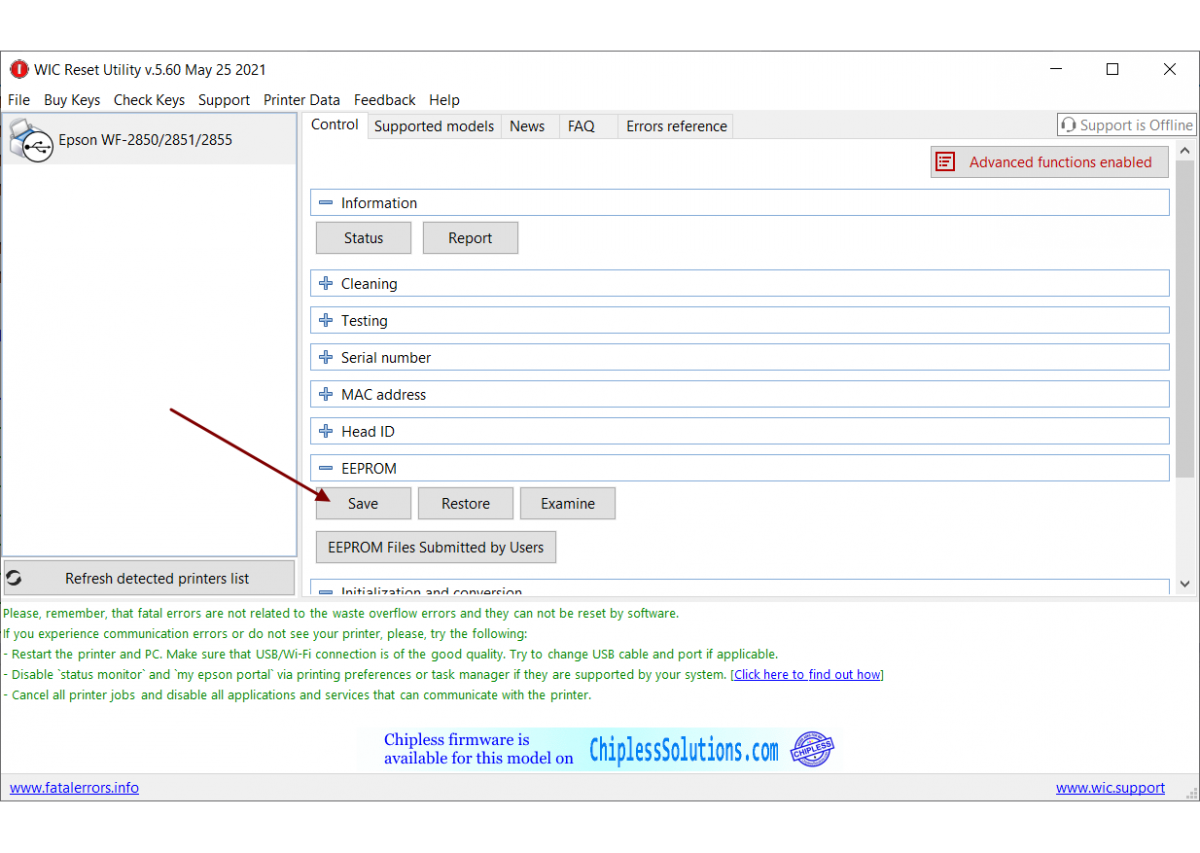
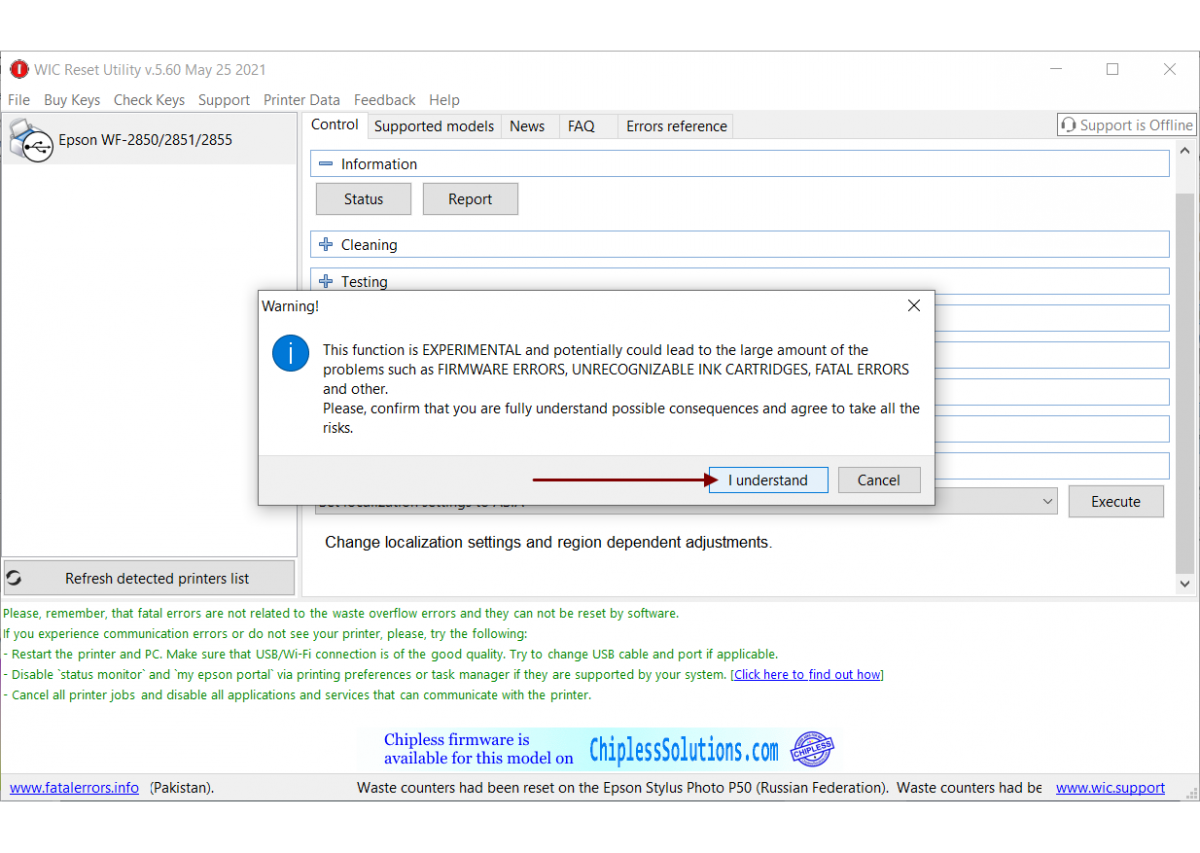
WICReset has the ability to change region data for some models, this will affect a lot of settings including available languages, default paper size and others. Here is how you can do it:
1. Enable advanced functions in the settings:

2. Save printer's EEPROM before changing region:

3. Select region from the `initialization and conversion` list and press execute:
4. Carefully read and confirm all warning messages:
5. Restart the printer.
Important!
If you have any problems with the new region then restore EEPROM data that has been saved during step 2 back to the printer.
-
When you revert to the official firmware now do you still have this problem?
-
Good day. Chipless firmware does not have any code that stops ink flow at all, do you have the same problem with blue when using official firmware?
-
If you saved recovery code, try to revert to the official firmware first and check the results.
-
Printer with chipless firmware should work even without IC, either firmware has not been succesfully uploaded/activated or official firmware was automatically installed afterwards. Please, make sure that printer has correct version of the firmware and restore chipless mode with recovery key if necessary.
-
Did you also disable firmware updates in the driver settings?
https://www.wic.support/how-to-disable-automatic-firmware-updates-on-epson-printers/
Also try to install software updater, disable automatic updates here and then uninstall it again.
-
What is shown on the printer when you do not have any ink cartridges installed?
-
Good day, are you sure that you do not have epson software updater installed and autoupdate is disabled in the driver settings? As far as I know this printer does not support autoupdate by itself, but if you have corresponding epson software it can update the printer even via Wi-Fi connection.
-
Please, send a photo of the printer's menu and example of printing quality.


how to turn off chipless Epson SC P807 Inspection mode flag
in Maintenance box
Posted · Report reply
When you press power button while inspection mode screen is on do you see this line:
Inspection Mode Flag: ON
or it is OFF?